

3 methods to run code after DOM update in Svelte
When I was learning Svelte, I was trying to figure the Svelte method for React componentDidUpdate(). Because sometimes I have small pieces of code that need to execute after the update has been made. Perhaps it’s another function, or maybe an AJAX call.
There are 3 methods that this article will cover. They lead from okay to best solutions:
- Okay:
setTimeout()function - Better:
afterUpdate()lifecycle function - Best:
tick()Svelte utility function
Let’s take a look at a simple example that may seem like it should work as intended, but doesn’t because of how Svelte works.
<script>
  let foo = 1;
  let bar = 2;
  let divEl;

  function handleUpdate() {

    //  Does not update immediately
    foo = 2;

    //  Does not update immediately
    bar = 5;

    //  Logs 1 + 2 = 3 (old content)
    console.log(divEl.textContent);
  }
</script>

<div bind:this={divEl}>
  {foo} + {bar} = {foo + bar}
</div>
<button on:click={handleUpdate}>
  Update numbers
</button>
As soon as the the handleUpdate() function gets executed, I tried to log the new div element content, but failed to do so.
Why didn’t the new div content get logged correctly? To answer this question, you must first need to know how Svelte lifecycle works.
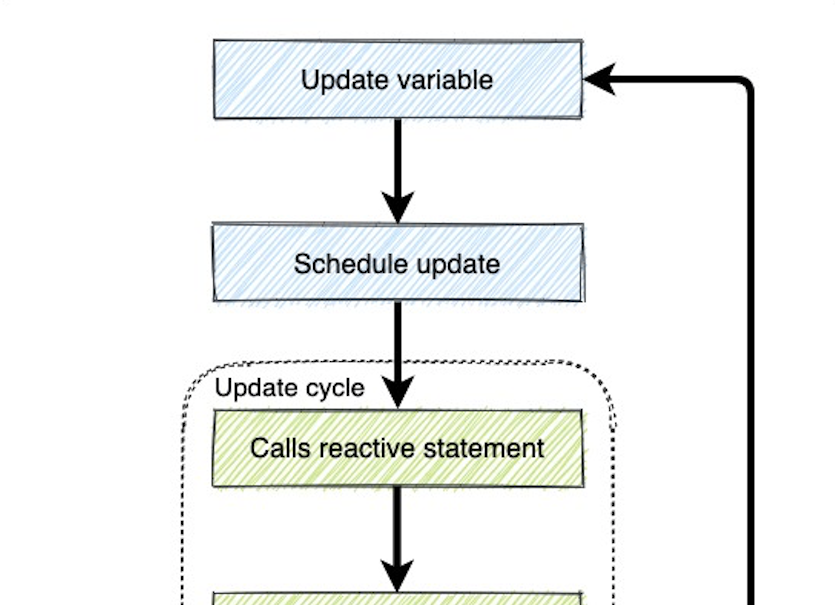
Svelte lifecycle diagram flow
The chart below is a oversimplify version, but it will give you a visual on the process.
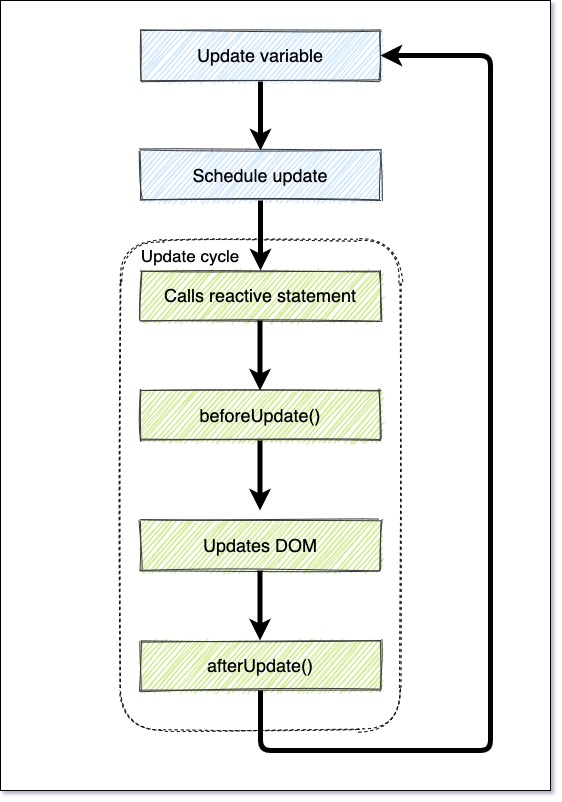
Whenever you update a variable in Svelte, it never updates immediately. It actually sends a queue or schedules and update to Svelte, that a variable needs to get updated.
By sending sending scheduled updates, this allows Svelte to grab multiple updates and execute them together at once.
Once it’s grabbed a batch of update requests, it will run through the process of calling the reactive statement, running beforeUpdate() lifecycle, updates the DOM, and finalizes with the afterUpdate() lifeycle.
Rinse and repeat.
Now that you know how the basics work. Let’s get into the 3 different methods that work to execute code after the Svelte component has finished updating completely.
Okay solution: setTimeout()
The first method is to use setTimeout(). This solution works because setTimeout() is a asynchronous function.
<script>
  let foo = 1;
  let bar = 2;
  let divEl;

  function handleUpdate() {

    //  Does not update immediately
    foo = 2;

    //  Does not update immediately
    bar = 5;

    //  Artificial delay. Logs 2 + 5 = 7
    setTimeout(() => console.log(divEl.textContent), 0)
  }
</script>

<div bind:this={divEl}>
  {foo} + {bar} = {foo + bar}
</div>
<button on:click={handleUpdate}>
  Update numbers
</button>
Even though this method works, it’s artificial and inelegant. Let’s go to a better solution.
Better solution: afterUpdate()
A better solution then using setTimeout() is to use the afterUpdate() lifecycle function that Svelte provides.
<script>
  import { afterUpdate } from "svelte";
  let foo = 1;
  let bar = 2;
  let divEl;

  function handleUpdate() {
    //  Does not update immediately
    foo = 2;

    //  Does not update immediately
    bar = 5;
  }

  // Logs 2 + 5 = 7
  afterUpdate(() => console.log(divEl.textContent));
</script>

<div bind:this={divEl}>
  {foo} + {bar} = {foo + bar}
</div>
<button on:click={handleUpdate}>
  Update numbers
</button>
afterUpdate() runs your code once the DOM is in sync with your data.
To use afterUpdate() is must be on the root of the <script> tag element.
Best solution: tick()
Svelte provides another function called tick(). This function returns a promise and gets executed as soon as the DOM in sync with the data.
<script>
  import { tick } from "svelte";
  let foo = 1;
  let bar = 2;
  let divEl;

  async function handleUpdate() {
    //  Does not update immediately
    foo = 2;

    //  Does not update immediately
    bar = 5;

    // Waits until Svelte finished updating the DOM
    await tick();

    // Logs 2 + 5 = 7
    console.log(divEl.textContent);
  }
</script>

<div bind:this={divEl}>
  {foo} + {bar} = {foo + bar}
</div>
<button on:click={handleUpdate}>
  Update numbers
</button>
You may use the await keyword for a more elegant coding style.
The other benefit to this function is that it can be used anywhere in your JavaScript code.
Hey, you’ve made it this far! If you found this article helpful, I would appreciate it if you liked or retweet the tweet below!
I like to tweet about Svelte and post helpful code snippets. Follow me there if you would like some too!
