

How to get the current price of Bitcoin with Next.js and Coinbase API
I’m a big fan of buying and selling Bitcoin and Ethereum on Coinbase. It got me wondering, “Does Coinbase have an open API for the market data of a cryptocurrency?”
The answer is, there is one! I found out that Coinbase does provide a API that gives you access to public market data about a cryptocurrency such as Ethereum and Bitcoin. And it has other neat private API’s for funding and trading within your Coinbase account.
But in today’s article will focus on creating a Next.js application that fetches public data from Coinbase API and render the data on a web page.
The full source code can be found by clicking here.
First, if you’re looking into trading Cryptocurrency, you might want to create an account with Coinbase. Coinbase a great solid variety of cryptocurrencies to trade, and has an extremely simple and friendly user interface.
Start trading with Coinbase and get $5 free in Bitcoin.
Disclaimer: The three Coinbase links are affiliate links where I may receive a small commission for at no cost to you if you choose to purchase a plan from a link on this page. However, this is merely a service I full recommend when it comes to trading cryptocurrencies.
Let’s get started!
Step 1: Create a Coinbase account (Optional)
Create an account with Coinbase, if you want to do more than just getting public market data from a cryptocurrency.
Once you create your Coinbase account you can generate an API key and a private key.
Here’s a list of features you can do with Coinbase API:
- Get ticker sell or buy price (public)
- Request withdrawals (private)
- Make deposits (private)
- Buy or sell cyrptocurrency (private)
Click here to get started with cryptocurrency trading with Coinbase.
Step 2: Install dependencies and setup package.json file
Installing dependencies is always the easiest part of a project. Copy the command below and enter it in your terminal.
npm i -S next react react-dom isomorphic-fetch
Your package.json file should have been updated.
We’ve installed the following libraries to our project:
next– Our React frameworkreact– The UI libraryreact-dom– Attaching React to the DOMisomorphic-fetch– Will help you make requests to Coinbase API.
Here’s what the package.json file should look like:
{
  "name": "nextjs-sandbox",
  "version": "1.0.0",
  "scripts": {
    "dev": "next",
    "build": "next build",
    "start": "next start"
  },
  "dependencies": {
    "isomorphic-fetch": "3.0.0",
    "next": "latest",
    "react": "^16.7.0",
    "react-dom": "^16.7.0"
  }
}
Step 3: Import libraries and setup Coinbase API base url
In our Next.js project, I’m going to do all the code within the index.js file inside the pages directory.
import { useState } from "react";
import Head from "next/head";
import fetch from "isomorphic-fetch";

const COINBASE_BASE_URL = "https://api.coinbase.com/v2";
The first 3 lines of the code snippet above is just importing some utilities that will be used in the project.
The important part of the code above is the COINBASE_BASE_URL variable.
COINBASE_BASE_URL holds the Coinbase base URL.
https://api.coinbase.com/v2
Step 4: Create custom React hook to find ticker market data
In the index.js file, I will create a custom React hook called useFindTicker().
const useFindTicker = () => {
  // Holds value for search form
  const [symbol, setSymbol] = useState("");

  // Holds data value of cryptocurrency market data
  const [data, setData] = useState(null);

  // Holds error messages from Coinbase API
  const [error, setError] = useState(null);

  return {
    setSymbol,
    data,
    error,
    getTodayPrice: async () => {
      try {
        // No need to make a request if symbol value is empty.
        if (symbol.trim().length < 1) {
          setError([{ message: 'Enter a symbol and fiat currency. e.g - BTC-USD' }])
          return;
        }

        // Fetch ticker data from Coinbase API
        const res = await fetch(`${COINBASE_BASE_URL}/prices/${symbol.trim()}/buy`);
        const { errors, ata } = await res.json();

        // IF any errors, set error to state
        setError(errors);

        // Set ticker data to state
        setData(data);
        return;
      } catch (e) {
        console.error(e);
      }
    }
  };
};
The purpose of this custom Reach hook is to store the symbol value from the search form, and the data or error messages being returned from the Coinbase API.
Let’s do a quick breakdown of the code.
// Holds value for search form
const [symbol, setSymbol] = useState("");

// Holds data value of cryptocurrency market data
const [data, setData] = useState(null);

// Holds error messages from Coinbase API
const [error, setError] = useState(null)
symbol – Is the React state variable for the Cryptocurrency symbol.
For example if I search BTC-USD which is the symbol for Coinbase to search for Bitcoin with USD currency values.
The value BTC-USD will be stored in the variable symbol.
The data React state variable holds any result returned from the Coinbase API.
The error React state variable holds any error messages returned from the CoinbaseAPI.
The next important piece of code is the getTodayPrice() function.
getTodayPrice: async () => {
  try {
    // No need to make a request if symbol value is empty.
    if (symbol.trim().length < 1) {
      setError([{ message: 'Enter a symbol and fiat currency. e.g - BTC-USD' }])
      return;
    }

    // Fetch ticker data from Coinbase API
    const res = await fetch(`${COINBASE_BASE_URL}/prices/${symbol.trim()}/buy`);
    const { errors, result } = await res.json();

    // IF any errors, set error to state
    setError(errors);

    // Set ticker data to state
    setData(data);
    return;
  } catch (e) {
    console.error(e);
  }
}
The getTodayPrice() function does the following:
- Makes sure that the React state variable
symbolis not empty. If it is empty, it does not proceed. - Makes a request to Coinbase ticker endpoint
- Checks if any errors came back. If so, it updates the
errorReact state variable. - If endpoint returns the result, update the React state variable,
data.
Here’s what a successful response should look like.
{
    "data": {
        "base": "ETH",
        "currency": "USD",
        "amount": "1293.22"
    }
}
Step 5: Create React component to render ticker market data
The final part is to create the React search form and the cards to show the results.
Creating the Cryptocurrency React form
export default () => {
const { getTodayPrice, setSymbol, data, error } = useFindTicker();
// On submit handler
const handleSubmit = () => getTodayPrice();
// On input change handler
const handleChange = (e) => setSymbol(e.target.value);
return (
<>
<Head>
<link rel="stylesheet" href="/styles.css" />
</Head>
<div className="container">
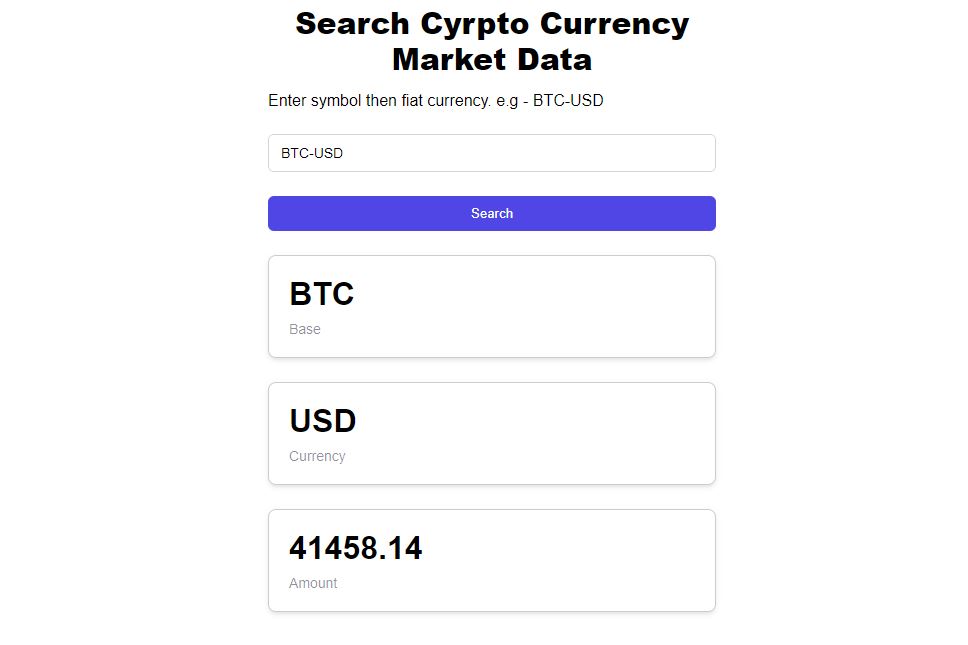
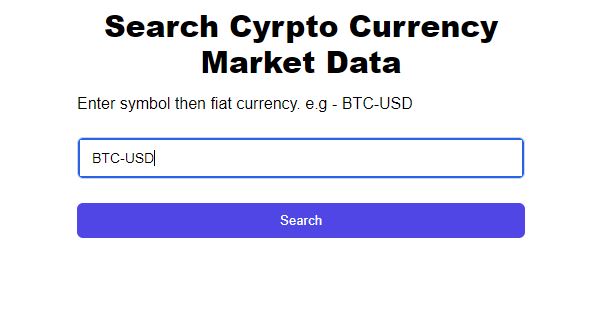
<h2 className="headline">Search Cyrpto Currency Market Data</h2>
<div className="rounded-form">
<input type="text" placeholder="BTC-USD" onChange={handleChange} />
</div>
<div className="action-box">
<button onClick={handleSubmit}>Search</button>
</div>
</div>
</>
);
};
In the initial part of the React component, I’m using the custom React hook that was created, useFindTicker() and I’m destructuring it to access the getTodayPrice, setSymbol, data, and error variable.
I’ve also created a handleSubmit() handler function that uses the getTodayPrice() from the custom hook that was created.
The handleChange() handler function uses setSymbol to save each character entered in the search field to the React state variable symbol.
The rest is fairly simple. I’m just creating a JSX/HTML to render the form.
I’ve also attached the handleSubmit() function to the search button and the handleChange() function to the input element.
Display data or error message
The final step is to output the data from the Coinbase API endpoint.
export default () => {
  // ... useFindTicker() and handler functions

  return (
    <>
      {/* ... search form code */}

      {(error && <h1 className="headline">{error[0].message}</h1>) ||
        (data && (
          <div className="container result">
            {Object.keys(data).map((dataKey, i) => (
              <div key={`${dataKey}-${i}`} className="card">
                <h3 className="card-value">
                  {data[dataKey]}
                </h3>
                <p className="card-label">{dataKey}</p>
              </div>
            ))}
          </div>
        ))}
    </>
  );
};
Step 6: Run it
That’s pretty much it. Go ahead and run your program.
npm run dev
Source code
If you would like access to the source code. Click here.
First, if you’re looking into trading Cryptocurrency, you might want to create an account with Coinbase. Coinbase a great solid variety of cryptocurrencies to trade, and has an extremely simple and friendly user interface.
Start trading with Coinbase and get $5 free in Bitcoin.
Disclaimer: The three Coinbase links are affiliate links where I may receive a small commission for at no cost to you if you choose to purchase a plan from a link on this page. However, this is merely a service I full recommend when it comes to trading cryptocurrencies.
Oh wow, you’ve made it this far! If you enjoyed this article perhaps like or retweet the thread on Twitter:
I like to tweet about Next.js and post helpful code snippets. Follow me there if you would like some too!
