

Start building React applications in less than 3 minutes

React is the new shiny toy in the JavaScript community, and most industries are leaning towards to using that technology.
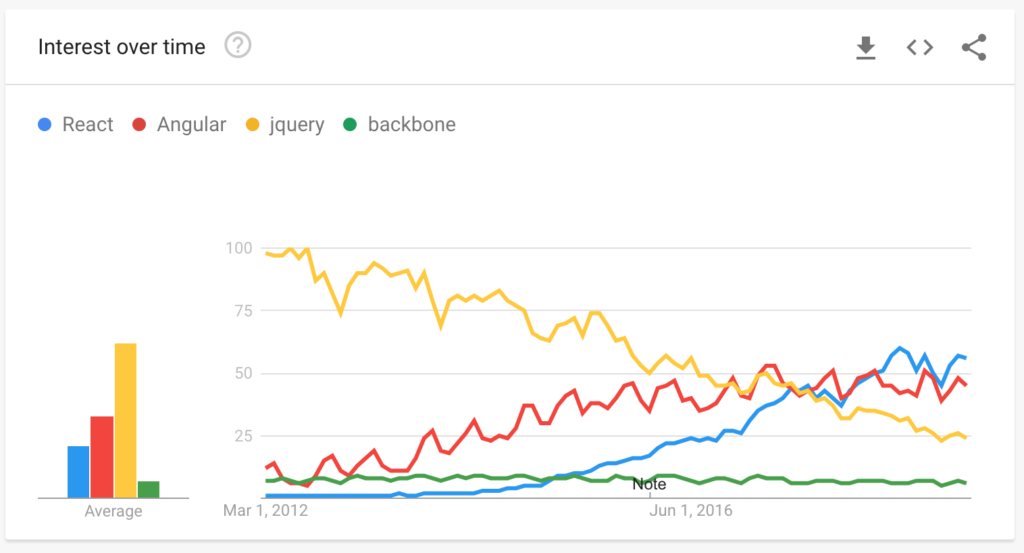
You may be coming from Angular, jQuery, or even Backbone, and learning a new tool may sound daunting or even scary.
No need to fear, in this article I will go over some easy methods to get a React application started in matter of minutes.
But Before we start, why React though?
Why choose React
Reason #1 to choose React, it’s only a UI builder.
Tools like Angular, and Ember are full blown JavaScript frameworks that require you to do their way.
And that’s okay, but React doesn’t make any assumptions about your application. It doesn’t force you to rewrite your entire app.
Reason #2 to pick React is because it’s component based.
React encapsulates all the CSS, UI, state, and events in a single file OR directory.
It makes it easy for engineers to digest a large code base because it’s in smaller chunks.
Reason #3 to pick React is because is declarative.
It allows you to write declarative views which makes it easy to maintain and debug down the line.
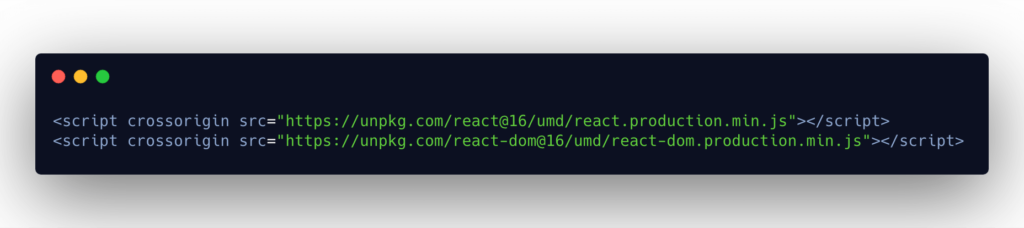
Starting with CDN links
Source to CDN links: https://reactjs.org/docs/cdn-links.html
This is the easiest method to get started.
You just need to import React and React DOM through script tags.
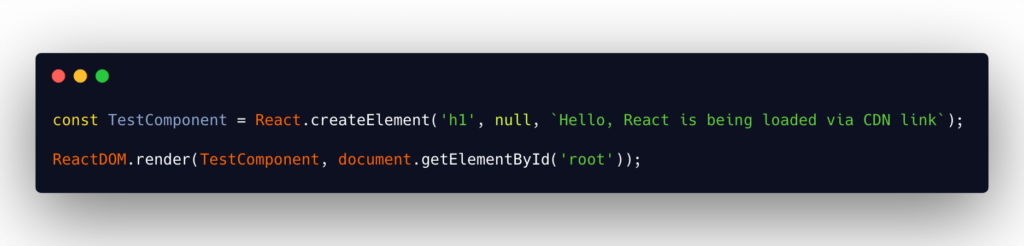
You can then create a JavaScript file begin creating your first React component in plain JavaScript.
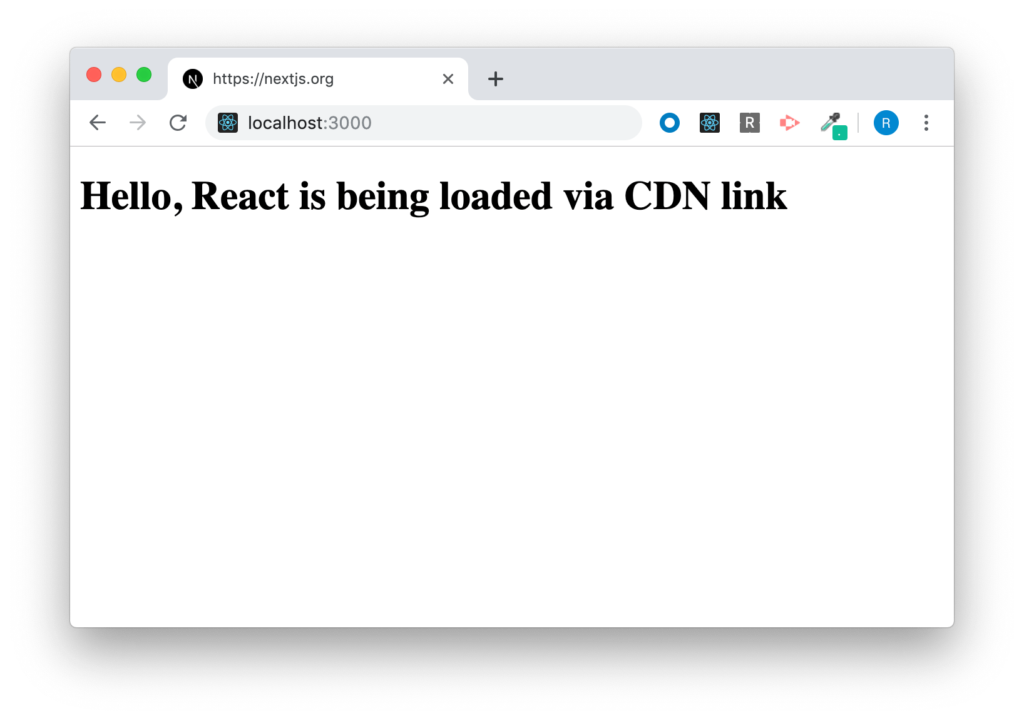
The output should look something like this
The next few methods require you to have Node.js installed on your machine.
Once it is installed, NPM command client tool will be available in the terminal.
Starting with Create React App
This is one of the easiest methods to get a new project up and running.
Run the command down below.

NPX comes with NPM 5.2+. NPX allows you not install Create React App on your machine.
I’m calling Create React App to create our project in a directory named, test-app.
Create React App will then download all the dependencies that it comes with.
The video above is from create react app.
Once Create React App has completed installing the dependencies it will then ask you to go into your project directory (via terminal) and execute the following commands.
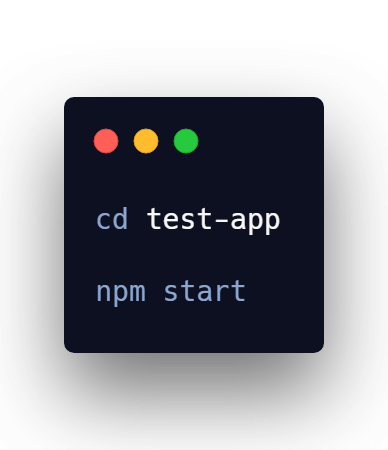
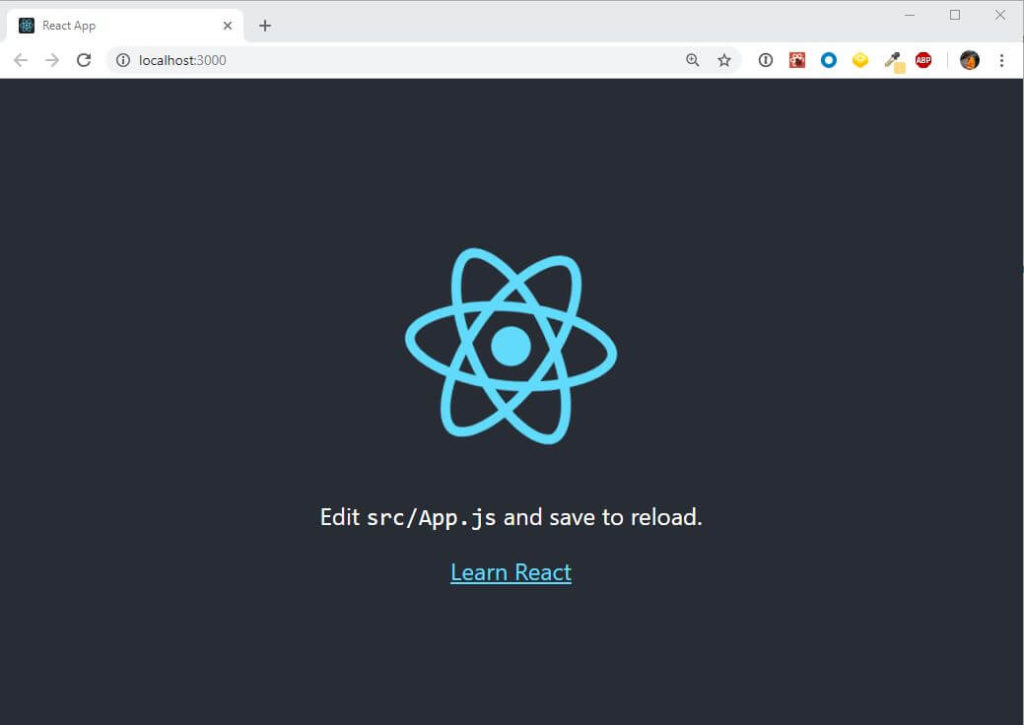
By running npm start, Create React App development will kick in and open you
Create React App doesn’t just install a few node module dependencies, but it also provides the following:
- JSX, ES6, and TypeScript Support
- Auto prefixed CSS
- Hot reloading for development
- A build script to bundle your JavaScript, CSS, and images
- Progressive Web App ready
Pretty simple to start with Create React App, but this is just a JavaScript site at the end of the day.
What if you want to build your own personal site, should you use Create React App?
Probably not, because JavaScript sites don’t benefit you in SEO.
You’re going to need something that let’s you build the UI of your website with React and renders it with a server language such as Node.js.
Now we can do this setup manually, but why?
There are plenty of great open source tools out there that do that for us.
Starting with Next.js
Resource link: Next.js
Next.js is my framework of choice to create server side rendered React applications or sites.
Next.js is lightweight, progressive web app ready, and most importantly, SEO friendly.
By the way, this site (linguinecode.com) you’re reading off is using Next.js to power the front-end!
Next.js does require a few more steps but it’s nothing to hard. I’ll walk you through it.
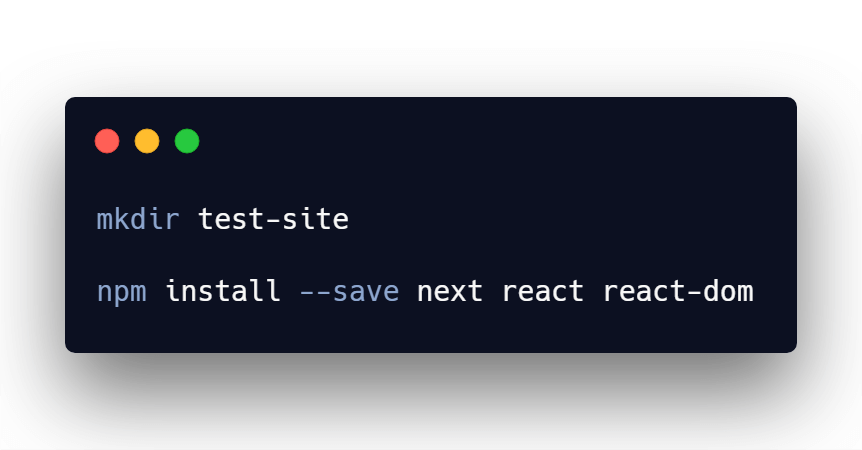
First I created a new directory for my site, and called it test-site.
The next step is to install 3 node module dependencies.
- Next
- React
- React DOM
We briefly spoke about React, and React DOM earlier in this article.
Those 2 libraries will help me create React code and dump it to the DOM.
The next dependency I installed is Next.
Next is what will help me bridge the gap between Node.js and React.
Next.js is responsible to serve your site through server code first, and let JavaScript aka React to handle loading the rest of the site as a user navigates around.
JavaScript is fast, once it’s loaded, so we aid the load speed by letting Node.js do the first load of the site.
The next step is to create a package.json file and add the following lines of code.
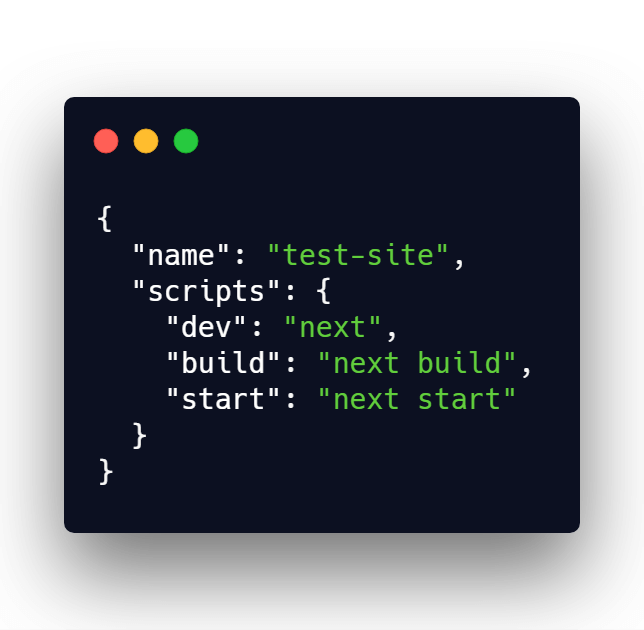
The important lines are in the scripts object.
Running npm run dev will spin up development mode.
Running npm run build will build, and optimize the site or application for production.
And running npm run start will run your production build.
Fairly simple, but now I’m going to start adding a couple pages.
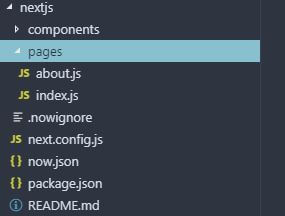
This is what a typical Next.js project structure looks like.
The directory pages, is extremely important when using this framework.
That’s because Next.js will look each file inside that directory and create routes based on the file name.
So index.js will represent the front page of the site/application
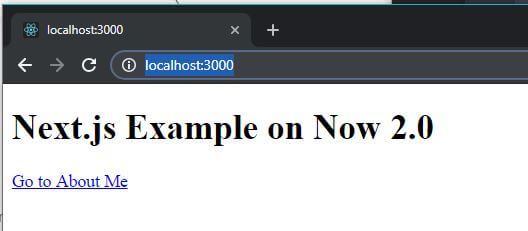
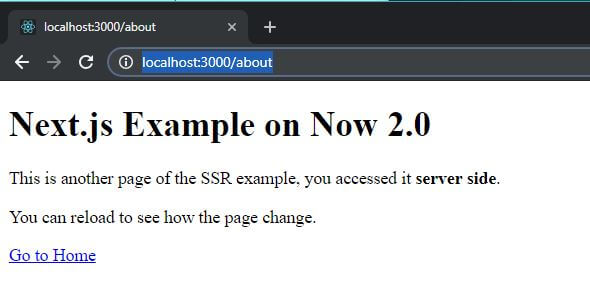
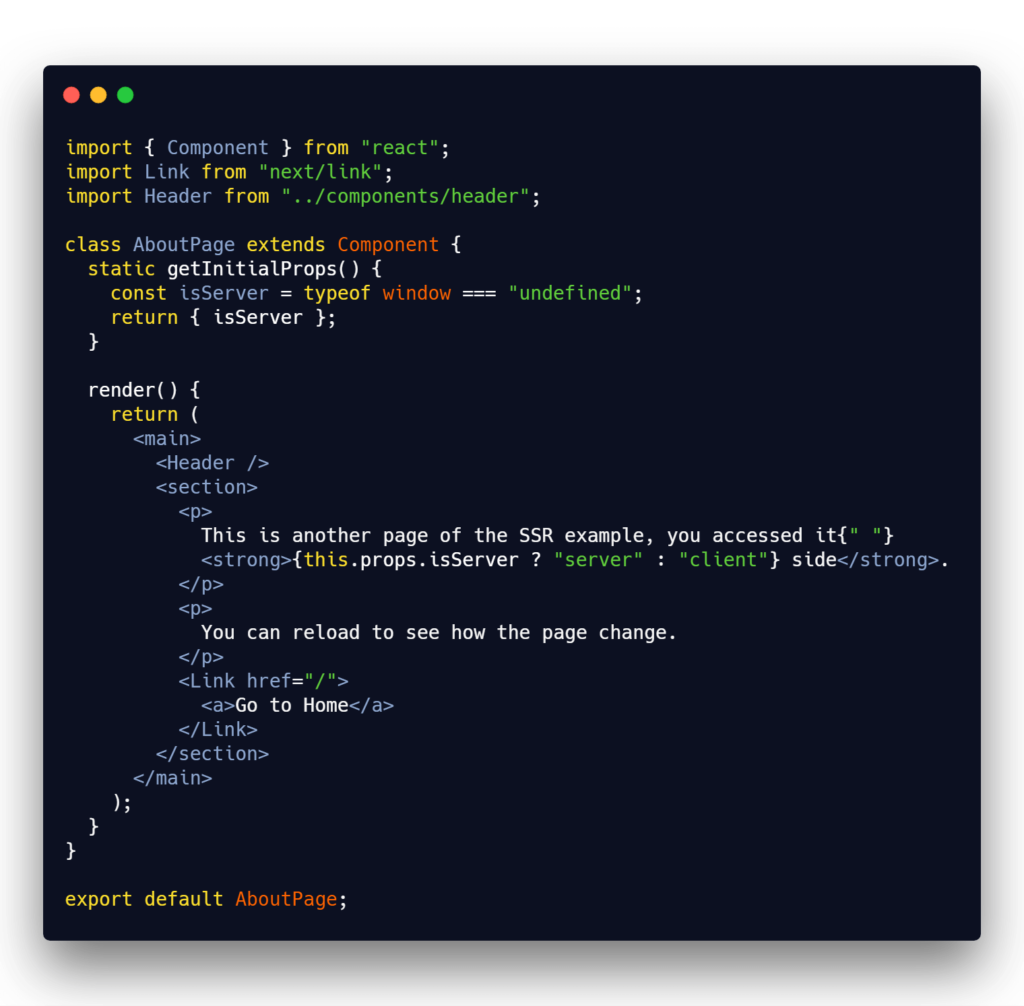
And about.js will look like:
That’s great but what does the code in each page look like?!
That’s a great question, it’s just a React component.
This is a beautiful thing because Next.js just lets you focus on the UI of your website or application.
There’s another neat little feature that Next.js provides to the developer.
Next.js provides a static method to your React component called getInitialProps.
This static method is only provided in the React components found in the pages directory. No children component have access to this static method.
getIntialProps runs both on server and client side of the application/site.
That’s where you can typcically make fetch calls to API’s. This will help make sure that the page is populated with content before serving it to the user.
In the example above, I’m just returning the isServer variable that’s provided.
It let’s my site know if the page was accessed on the server side or client side.
Conclusion
In this article I go over some of the easiest ways to initialize and get right in coding React applications.
Getting started with React may seem tricky and complicated. But with the enormous amount of support from the community, starting a React app can be matter of minutes.
I like to tweet about React and post helpful code snippets. Follow me there if you would like some too!
