

Add an Okta sign in widget with React

Okta has been growing over 45% year over year since 2017, and it doesn’t seem to be slowing down.
Big and small companies are using Okta for their external and internal software tools.
Okta is a user authentication management tool that helps businesses manage their employees software accounts with their company software tools.
For example, let’s say I own a cat store and I use Slack, Jira, and Github.
If I hire an engineer, I’ll have to create multiple accounts for that specific engineer.
And if that engineer leaves, I’ll have to go through each tool and remove that person account. This is a problem.
Instead of doing all that manual work, you can integrate all those software tools to an Okta account and assign an Okta user to a software tool.
That means you can create 1 Okta user to your Okta account, and Okta will handle adding and removing an account for all your software tools that you’ve integrated with.
The neat part about Okta is that you can implement it to your own internal applications.
In this article I’ll go over 8 easy steps to adding Okta authentication to your React application.
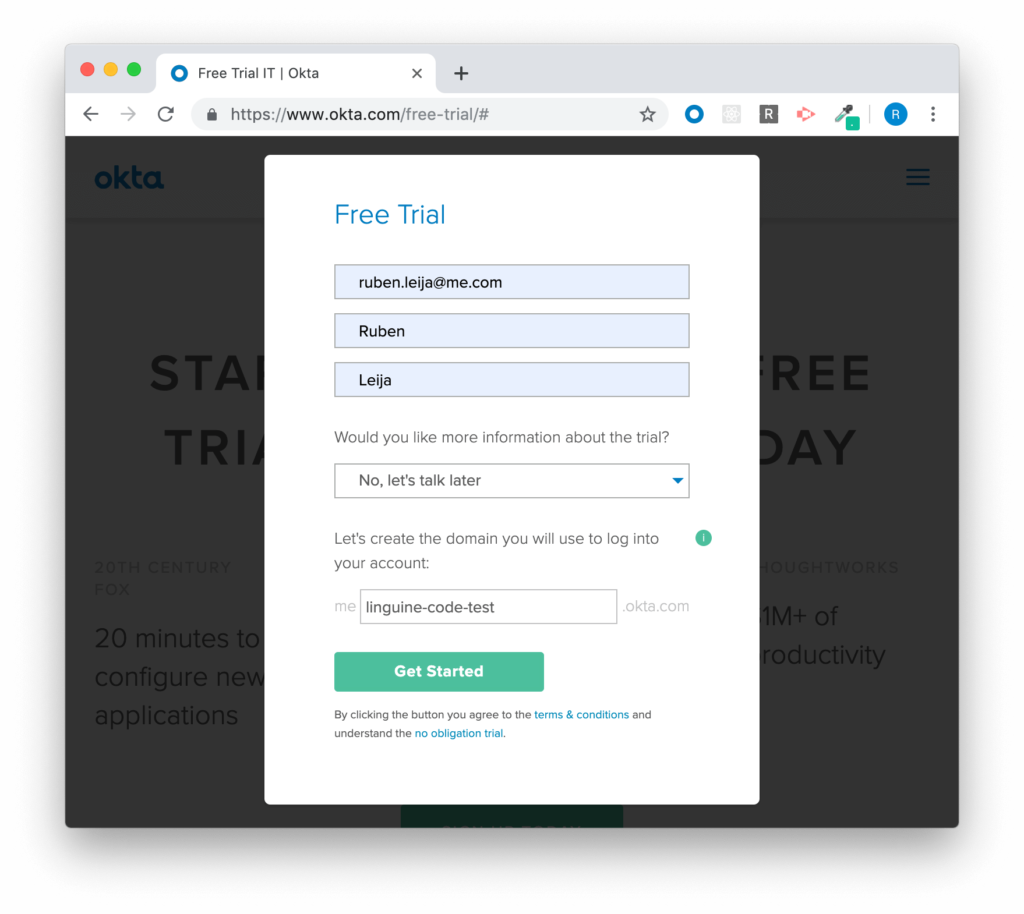
Step 1: Create Okta account
First step is to head over to the okta.com and create an account.
You can create a free 30 day trial account to test on. But if you have one already go to step 2.
That’s pretty easy.
You will than receive an email with your log in credentials, and a link to the log in page.
Go ahead and log in, and set your new password.
Step 2: Create an Okta app
Once you’re logged in, you’ll need to head over to the application page.
You can find that under the Application menu tab when you hover over it.
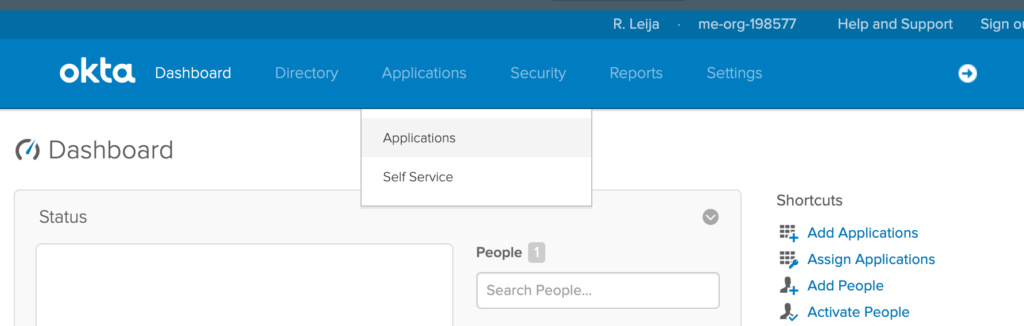
There is also a shortcut link to add a new application on the right side.
But if you’re in the application page then click Add Application next.
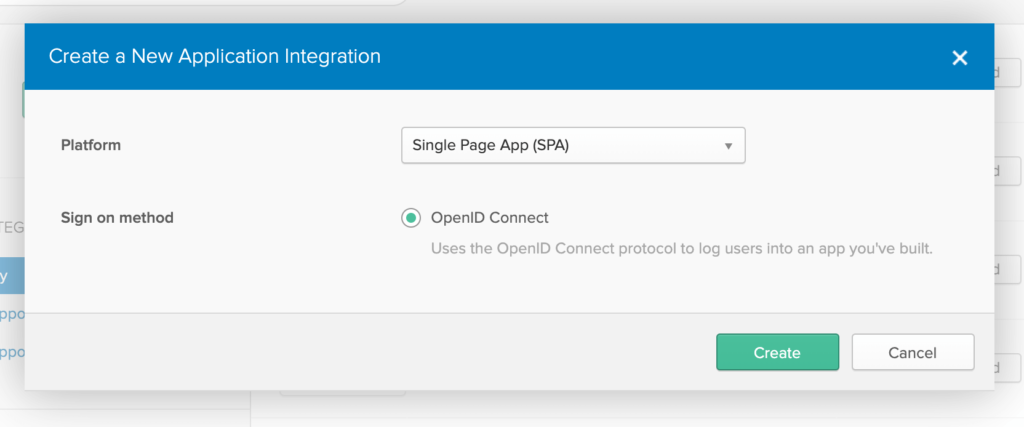
Then click on Create New App. It should be a green button on the left hand side.

A popup will be presented, and you’ll need to add the following configuration to fit your React application.
You will than be prompted to add some basic setting configuration about your app.
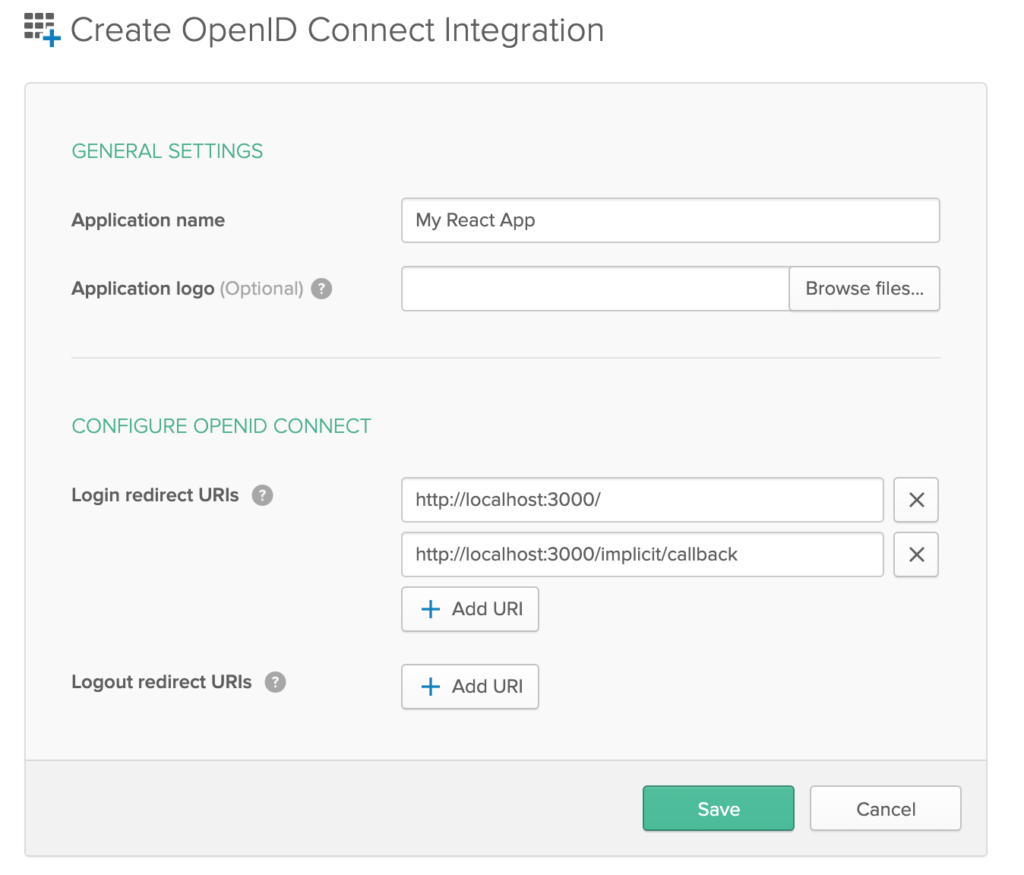
For the moment you can add your current localhost and port number for for your test app.
Click Save once those are added.
In the bottom page of your Okta app you’ll find your Client ID.
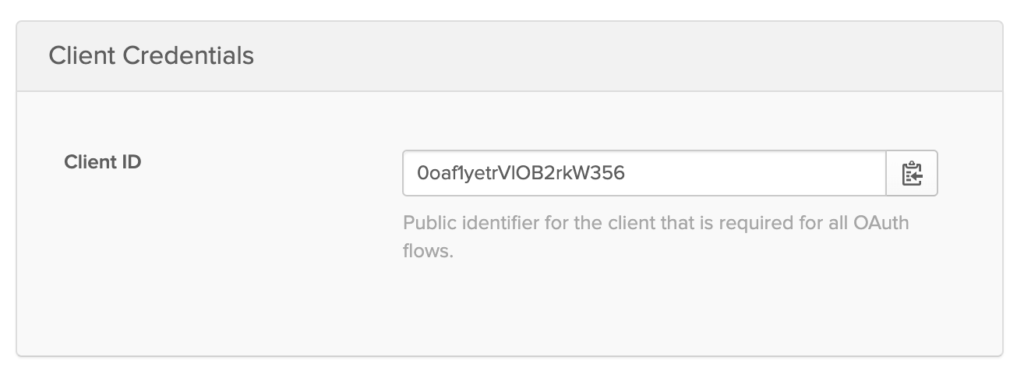
Click on the right button to copy it to your clipboard.
Step 3: Assign user to Okta app
The next step is to assign a user to your Okta app.
If a Okta user is not assigned to that app, they will get denied.
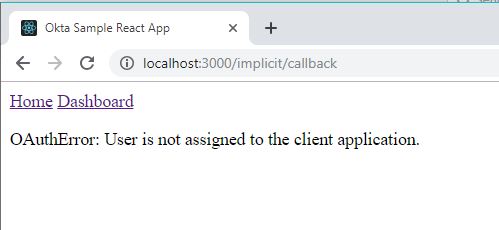
That’s okay too if you want. But at least add yourself!
Go back to the application page and click on the Assign Application button.
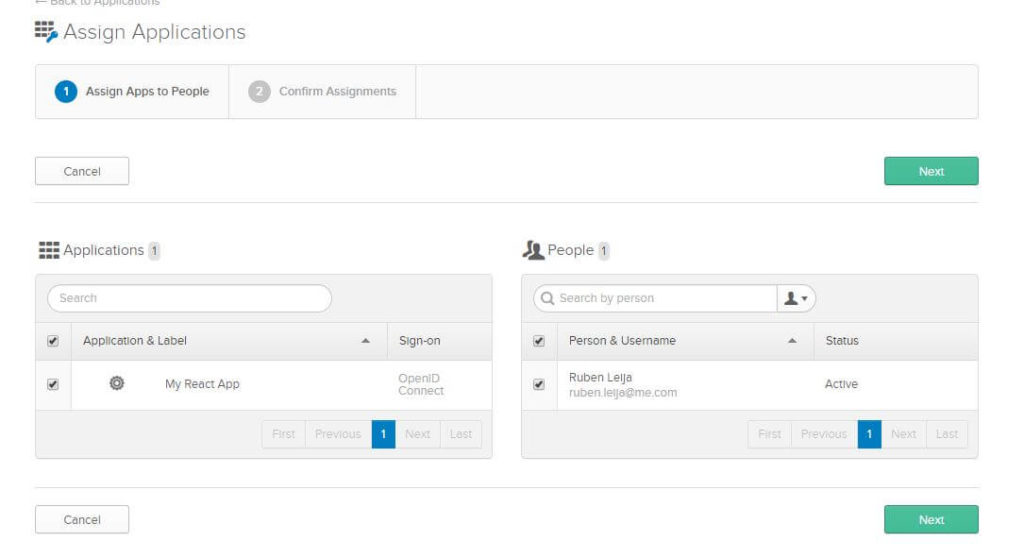
Select your application and the user you want to assign it too and click Next.
And click the confirmation button right after.
Step 4: Add trusted origin to Okta
The last configuration that you need to do in your Okta account is to add your trusted origins.
This will make sure we can avoid any CORS issues.
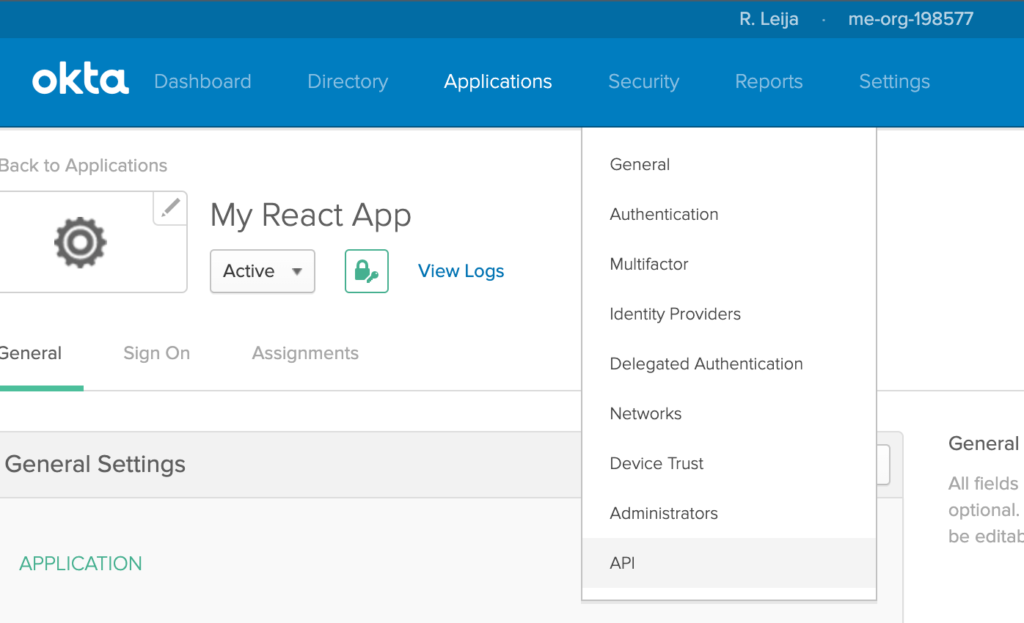
Hover over the Security menu and select the API sub menu item.
The first tab you’ll see in the page is about tokens, but we want to change that to Trusted Origins tab.
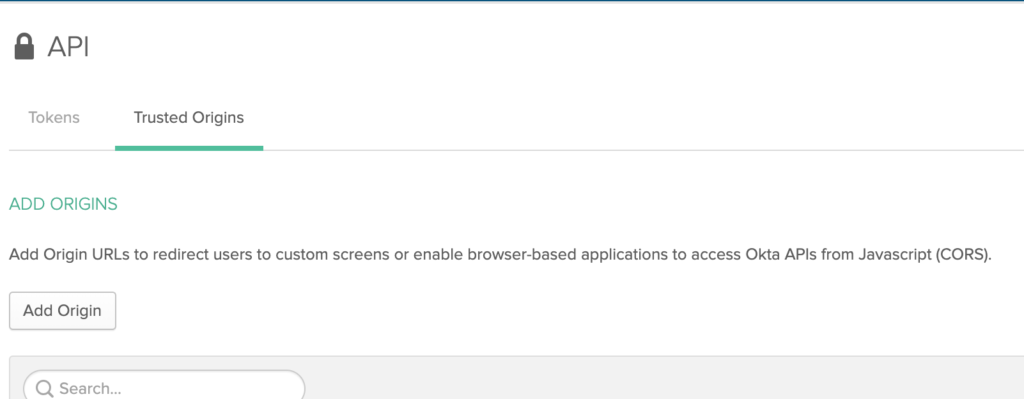
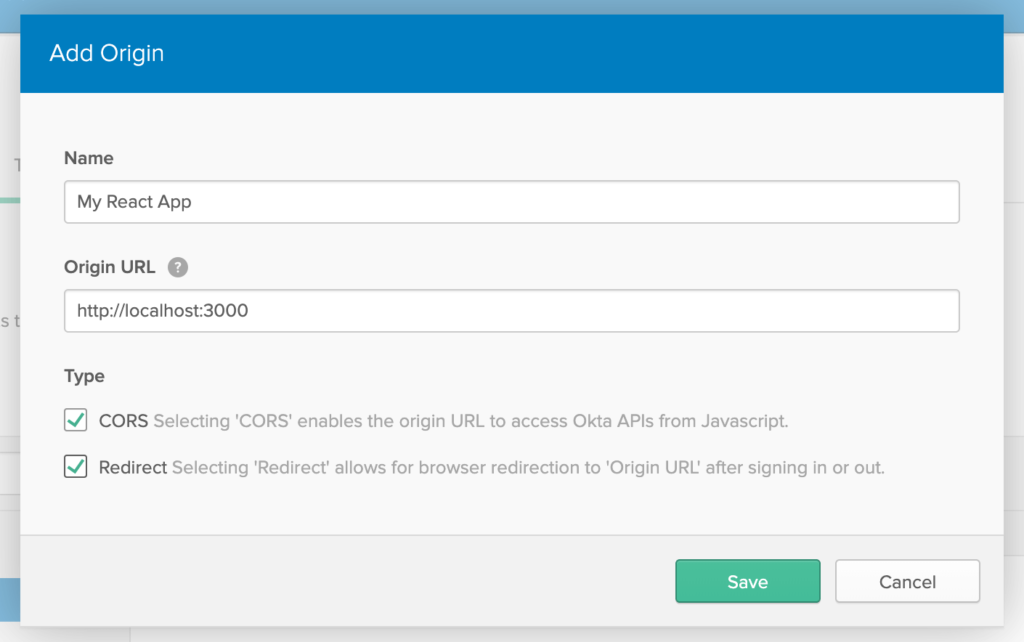
And select Add Origin next.
Add the following field values onto the form and click Save.
The boring stuff has been completed. Now the coding begins.
Step 5: Create React app
To keep this example guide simple I’m going to use Create React App tooling to help us get quicker to the important part of this guide.
Let’s create a directory called okta-sample.
Inside our new directory, create a package.json file and add the following.
{
  "name": "test-app",
  "version": "0.1.0",
  "private": true,
  "dependencies": {
    "@okta/okta-react": "^1.2.0",
    "react": "^16.8.4",
    "react-dom": "^16.8.4",
    "react-router-dom": "^5.0.0",
    "react-scripts": "^3.2.0"
  },
  "scripts": {
    "start": "react-scripts start",
    "build": "react-scripts build",
    "test": "react-scripts test",
    "eject": "react-scripts eject"
  },
  "eslintConfig": {
    "extends": "react-app"
  },
  "browserslist": [
    ">0.2%",
    "not dead",
    "not ie <= 11",
    "not op_mini all"
  ]
}

Now you may install those dependencies by running npm install.
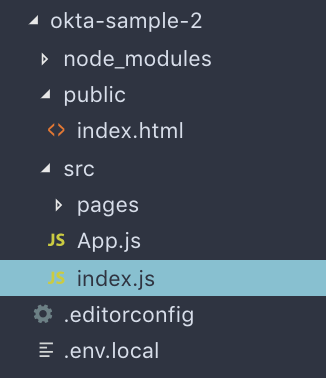
Let’s also create a directory called public and src in the root of the project.
Inside the public directory let’s add an index.html file.
<!DOCTYPE html>
<html lang="en">
  <head>
    <meta charset="utf-8">
    <title>Okta Sample React App</title>
  </head>
  <body>
    <noscript>
      You need to enable JavaScript to run this app.
    </noscript>
    <div id="root"></div>
  </body>
</html>

The index.html file will serve as a basic skeleton for the app.
In the src directory, all of your React code will live in there.
Inside src, create 2 files called index.js, and App.js. You’ll also need to add a pages directory inside the src directory.
Go ahead and run npm start. It should boot up a browser window pointed to localhost:3000.
And the web page should blank.
Step 6: Create the index file
In this file we’re doing a handful of actions here.
import React from 'react';
import ReactDOM from 'react-dom';
import { BrowserRouter } from 'react-router-dom';
import { Security } from '@okta/okta-react';

import App from './App';

const oktaConfig = {
  issuer: process.env.REACT_APP_OKTA_ISSUER,
  redirect_uri: `${window.location.origin}/implicit/callback`,
  client_id: process.env.REACT_APP_OKTA_CLIENT_ID,
};

ReactDOM.render(
  <BrowserRouter>
    <Security {...oktaConfig}>
      <App />
    </Security>
  </BrowserRouter>,
  document.getElementById('root'),
);

if (module.hot) module.hot.accept();

We’re initializing the Browser router and adding Okta’s Security component.
Which allows you to supply your Okta configurations to your React app.
P.S. don’t hardcode production configurations like in this example.
The issuer property is just the base URL to your Okta page. Don’t forget to add the slash (/) in the end.
The redirect_uri, and client_id can be grabbed from the Okta application page.
If you’re running your app locally during this step you might see your application broken.
That’s because App.js hasn’t been created or the routes. Let’s do that next.
Step 7: Create App.js file
import React from 'react';
import { Route, Link} from 'react-router-dom';
import { SecureRoute, ImplicitCallback } from '@okta/okta-react';
import LoginPage from './pages/Login';
import AdminDashboard from './pages/AdminDashboard';
const App = () => {
return (
<>
<Link to="/">Home</Link>
<Link to="/admin">Dashboard</Link>
<Route exact path="/" component={LoginPage} />
<SecureRoute exact path="/admin" component={AdminDashboard} />
<Route path="/implicit/callback" component={ImplicitCallback} />
</>
)
}
export default App;

In this file you’ll see how will put the pieces together.
The first step is to import React, React Router DOM modules called Route, and Link.
Route is going to help us define public routes.
And we’re going to use Link to help us build an easy 2 menu item navigation.
The first link will be pointing to the home page page which is the log in page.
The second link will help you go to the admin dashboard page.
The other important part to this file is the SecureRoute component that is provided by Okta.
This component helps you do the logic whether the user is allowed to enter the page. This is determined if the user is authenticated or not.
The last important piece to this file is the ImplicitCallback Okta React component.
This component helps handle the response after Okta tells React if the user has successfully signed in or not.
Step 8: Creating the admin dashboard & login page
The admin dashboard will be a file in the pages directory called AdminDashboard.js.
import React from 'react';

const AdminDashboard = (props) => {
  return <h1>Admin secure dashboar</h1>
};

export default AdminDashboard;

It’s a very simple and plain functional React component.
The next file to create is for our home page. Which will display a sign in button.
import React from 'react';
import { withAuth } from '@okta/okta-react';

class LoginPage extends React.Component {

  async componentDidMount() {
    const authenticated = await this.props.auth.isAuthenticated();
    console.log(this.props.auth)
    if (authenticated !== false) {
      console.log('User is authenticated??')
      const user = await this.props.auth.getUser();
      console.log(user)
    } else {
      console.log('User is not authentica')
    }
  }

  render() {
    return (
      <>
        <h1>Login page</h1>
        <button onClick={() => this.props.auth.login()}>sign in</button>
      </>
    )
  }
}

export default withAuth(LoginPage);

In the login importing Okta’s HOC(higher order component) called withAuth.
And I’m wrapping it around the React class component LoginPage.
This is important because withAuth provides new property to your React component called user prop.auth.
In the example above you can see that I’m using a method called login inside a onClick event for the button.
Inside the componentDidMount lifecycle you can see that I’m testing some of the other functionality that comes with withAuth such as checking if the user is authenticated, and getting the user information.
withAuth also provides other functionality such as:
- getIdToken
- logout
- getAccessToken
- handleAuthentication
Conclusion
Congratulations you’ve added Okta authentication to your React application!
Here’s the link to the source code. And if you found it interesting and helpful please give it a start!
I like to tweet about React and post helpful code snippets. Follow me there if you would like some too!
