

What is a component in Angular and how do you create a custom Angular component?

For the past 3 weeks, I’ve had to make the transition from React to Angular for work.
With that said, I had a lot of questions.
Why do I see so many .component.ts files? I know what a React component is, but what is it in Angular?
As I continue my learning with Angular, I will try to explain and educate anyone making this transition, or anyone who is starting to learn Angular.
In this article, I want to cover what a component in Angular is, why it’s used, and how to actually use it.
What is a component in Angular?
A component in angular is the controller for a view.
What does that mean?
In layman term, this file is responsible for attaching the HTML, the stylesheet, and any event bindings (on click, on hover, etc) together.
okay, let’s see how to create one!
How to create an Angular component?
There are 3 parts to creating an Angular component. The item is optional!
- Create component class
- Create HTML template
- Create stylesheet (optional)
To create a component class, is really simple.
First start by importing the @angular/core library and get the Component library.
import { Component } from '@angular/core';

@Component({
  templateUrl: './app.component.html',
  styleUrls: ['./app.component.scss'],
})
export class AppComponent {}
The next step is to instantiate the Component decorator and pass a config object.
- templateUrl: A relative or absolute path to a HTML file.
- styleUrls: A relative or absolute path to stylesheet file. This may be 1 or more files.
You may also pass another property called selector.
The selector property is a name identifier given to the component.
This is in case you want to use it in another Angular component.
Lets create 1 more Angular component that greets our users with a friendly message.
This example will demonstrate how to create an Angular component and how to use in another Angular component.
@Component({
selector: 'greet',
template: 'Hi there!
',
})
export class GreetComponent {}
In my GreetComponent I didn’t use the templateUrl property. That’s because you don’t have to use the templateUrl property!
You can write a string of HTML in the template property.
Remember the value of the selector property!
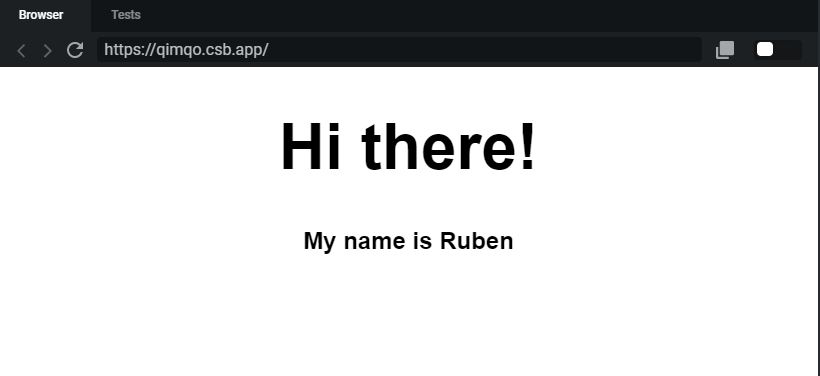
Let’s look at how to use a Angular component inside another component. I’ll start by creating my app.component.html file.
<!-- Greet component -->
<greet></greet>

<h2>My name is Ruben</h2>
Notice how in the HTML file I used the <greet> directive that I defined earlier! That’s how you use another Angular component in the HTML file.
The outcome should look like:
Sadly, we have 1 more step to take. In React creating a component, and using is as easy as just importing and embedding into your JSX file.
But in the Angular world there’s a tad bit more boilerplate to do.
How to make Angular component available in HTML
In the example above, I just showed how to create an Angular component, and how to use it in the HTML file, but…
That wouldn’t just work. We need to let our Angular application know that it can use it.
So another file must exist, app.module.ts.
import { NgModule } from "@angular/core";

import { AppComponent } from "./app.component";
import { GreetComponent } from "./greet.component";

@NgModule({
  declarations: [AppComponent, GreetComponent],
  bootstrap: [AppComponent]
})
export class AppModule {}
The sole purpose of this file is to help organize things that are related.
The declaration property, accepts an array of directives, components, and pipes. This a way to organize what Angular what’s available to your application.
How to pass data between components
One of the beautiful parts about React is passing data into another React component, and it’s really easy to do.
One of my questions, learning Angular was, how the heck do I do that?!
And it’s actually fairly simple once I found the answer.
So far, I’ve create an App component, and a Greet component on the code above.
The App component uses the Greet component to print, “Hi there!”, and the App component prints the rest of the message, “My name is Ruben”.
I’m going to change it up a bit, and make the Greet component accept a new input property called, message.
It’s going to be responsible to show the entire greeting message instead of chunks of it.
First I will update the greet.component.ts file.
import { Component, Input } from "@angular/core";

@Component({
  selector: "greet",
  template: "<h1>{{message}}</h1>"
})
export class GreetComponent {
  @Input() message: string = "";
}
I’m going to import the Input decorator, and use it inside my GreetComponent class.
In my class, I’m declaring that the GreetComponent accepts an input property called message.
I’m also modifying the template value. I’ve added an H1 HTML element and I’m printing out the value of message.
Now, let’s update the app.component.html file.
<div style="text-align:center">
  <greet message="Hi there, my name is Ruben."></greet>
</div>
I removed some of the HTML code and just passed a raw value to the greet directive.
If I wanted to reference a variable from my app.component.ts code, I would have to write as such
<greet message="Hi there, my name is Ruben."></greet>
Raw values don’t require you write brackets on the component directive. Variable values do require you to write brackets.
For the full example, check out the Github link below!
Github link: Basic app example
I like to tweet about Angular and post helpful code snippets. Follow me there if you would like some too!
