

How to setup your perfect Webpack dev server environment for React
So you wrote your entry and output point on your Webpack config file. What do you do next?
The next step is to create a development environment with Webpack, and add hot reloading.
That way it’s easy, and fast to develop your React application.
Why use Webpack dev server?
Under the hood, Webpack dev server is a mini Node.js Express server.
It uses a library called SockJS to emulate a web socket.
The Node.js server listens to when files were changed, and triggers events to react accordingly.
Webpack dev server is also a separate package that needs to get install via NPM.
Webpack dev server should ONLY be used for development.
Now that you know Webpack dev server may help you quickly develop a React application, let’s break down the steps.
- Create index.html file and public directory
- Setup package.json file and install dev dependencies
- Create helper variables and functions
- Configure Webpack mode, entry point, and output
- Setup Webpack dev server configuration
- Add Webpack bundle file to HTML file
- Add JSX support for development
- Run it
Setup index.html in public directory
The first step I will take is to create a directory called, public.
The public directory is responsible for holding any CSS stylesheets, image assets, and of course, your skeleton HTML markup.
Inside the public directory, I will add a file called, index.html.
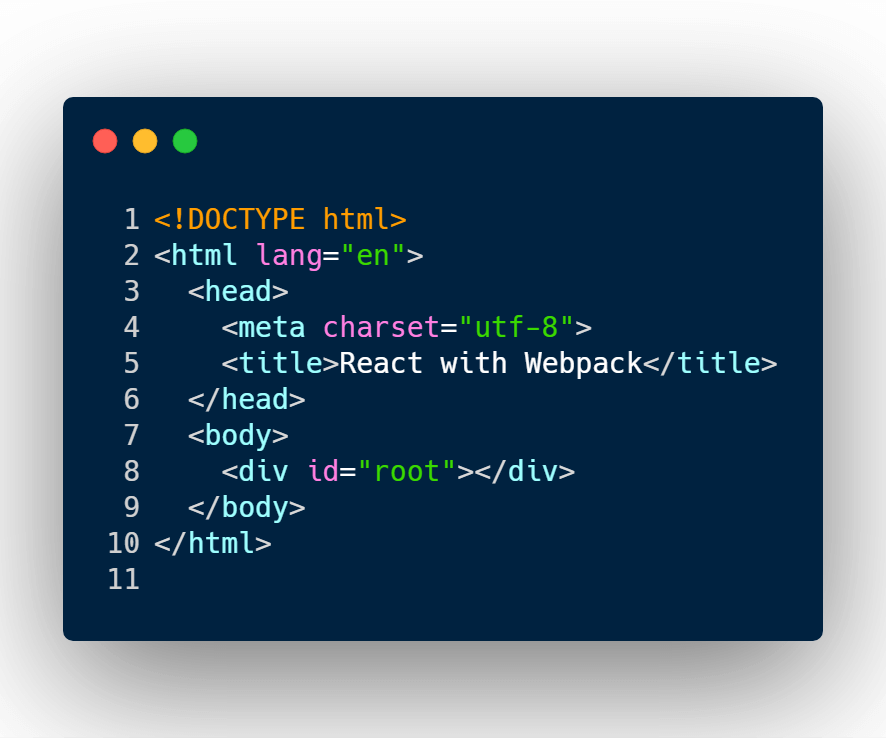
<!DOCTYPE html>
<html lang="en">
  <head>
    <meta charset="utf-8">
    <title>React with Webpack</title>
  </head>
  <body>
    <div id="root"></div>
  </body>
</html>
This HTML has 1 simple job, and that is to serve our React app and attach it to a div element with an ID of root.
Later in this guide, I will tell Webpack to use this HTML file for development and to automatically inject a script tag element at the bottom of this file.
That script tag will be the entry point to the React application.
How to install Webpack dependencies?
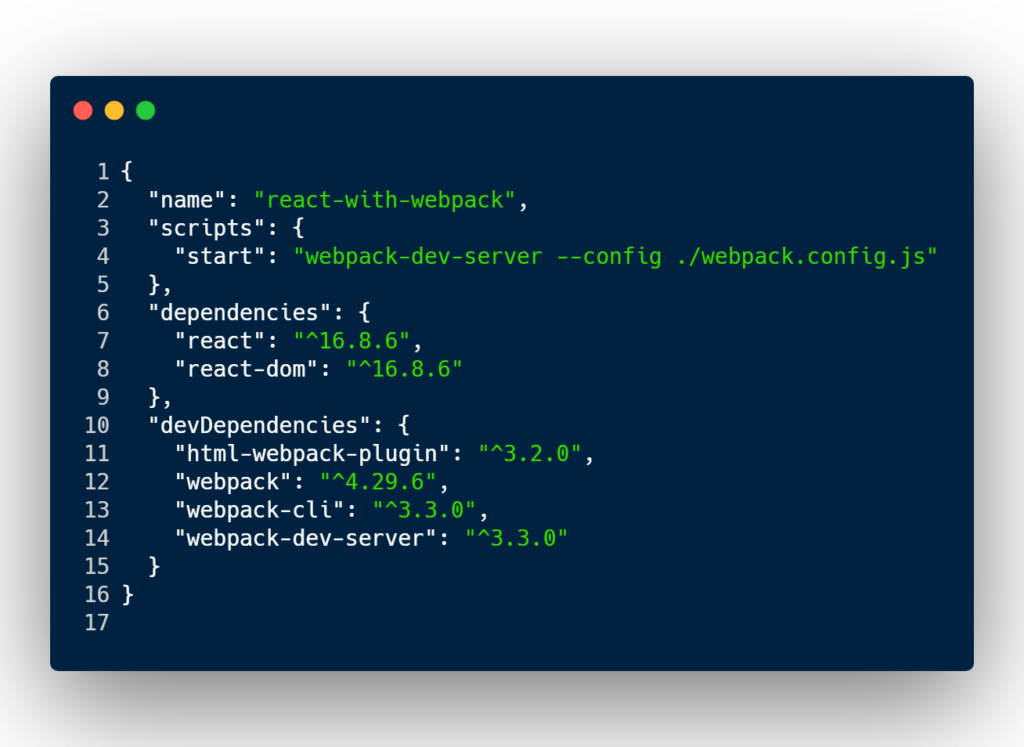
{
  "name": "react-with-webpack",
  "scripts": {
    "start": "webpack-dev-server --config ./webpack.config.js"
  },
  "dependencies": {
    "react": "^16.8.6",
    "react-dom": "^16.8.6"
  },
  "devDependencies": {
    "@babel/core": "^7.4.5",
    "babel-loader": "^8.0.6",
    "babel-preset-react-app": "^9.0.0",
    "html-webpack-plugin": "^3.2.0",
    "webpack": "^4.29.6",
    "webpack-cli": "^3.3.0",
    "webpack-dev-server": "^3.3.0"
  }
}
For the moment I’m going to install the minimal dependencies to get a React dev server running.
$ npm i react react-dom

$ npm i --save-dev html-webpack-plugin webpack webpack-cli webpack-dev-server
List of dependencies I’m installing:
- react – Will allow us to write React code
- react-dom – Will allow us to grab a React app and dump onto to the DOM
- webpack – Will allow us to bundle all of our code into a final build
- webpack-cli – Allows us to use the webpack command client tool
- webpack-dev-server – Will enable use to create a localhost dev environment
The next important part of this code is the script that was added.
When you’re going to run npm start on your terminal.
npm start will run the command client webpack-dev-server and tell it to look for the Webpack config.
Go ahead and run npm install to install these dependencies.
The next step is to work on the webpack config file.
Import modules and create some variables
In the root of the project I will create a file named webpack.config.js.
First I’m going to add some helpful variables and functions.

const path = require('path');
const fs = require('fs');
const HtmlWebpackPlugin = require('html-webpack-plugin');

// App directory
const appDirectory = fs.realpathSync(process.cwd());

// Gets absolute path of file within app directory
const resolveAppPath = relativePath => path.resolve(appDirectory, relativePath);

// Host
const host = process.env.HOST || 'localhost';

// Required for babel-preset-react-app
process.env.NODE_ENV = 'development';

module.exports = {}
On the first couple lines of code you’ll notice that I’m importing modules that were not defined in the package.json file.
That’s because Webpack utilizes Node.js to run. And the module path, and fs are native Node.js modules.
I’m utilizing the filesystem (fs) module to fetch me an absolute path of the current working directory of the project.
I’m also creating a variable, resolveAppPath, that is assigned to a function. This function is responsible to return a valid path.
It will be helpful when we need to define path values on our webpack configuration.
Speaking of, the Webpack configurations is nothing but an object that will needs to get export.
Setup Webpack configuration for entry and output
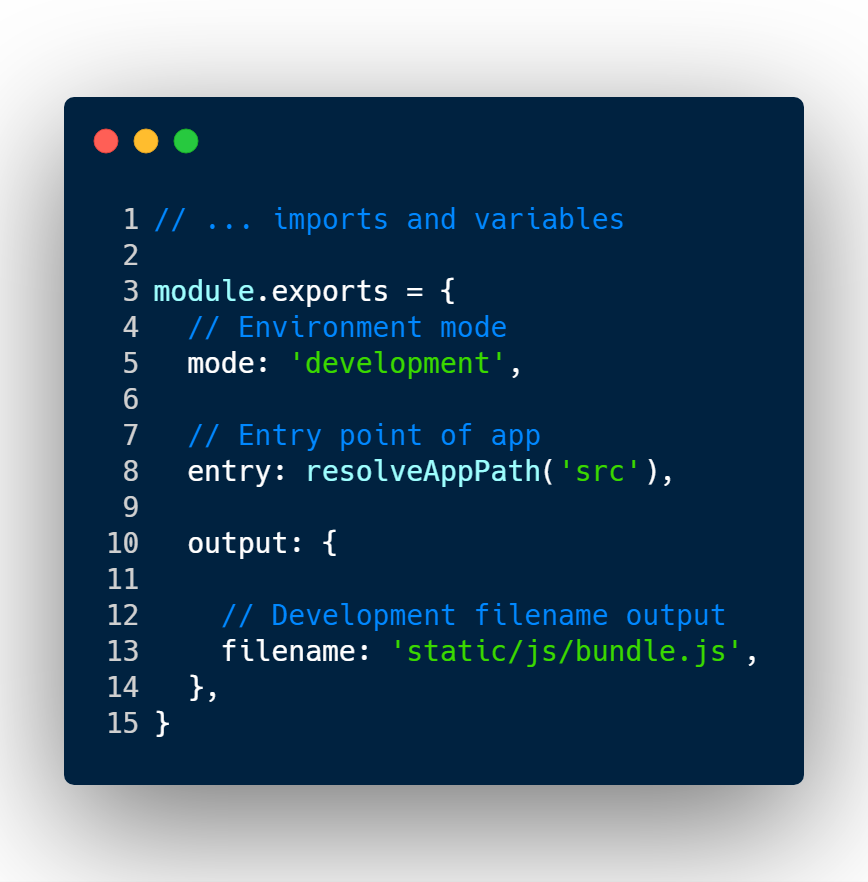
// ... imports and variables

module.exports = {

  // Environment mode
  mode: 'development',

  // Entry point of app
  entry: resolveAppPath('src'),

  output: {

    // Development filename output
    filename: 'static/js/bundle.js',
  },
}
This step is a required otherwise Webpack will throw an error.
mode – this property accepts 3 values, development, production, and none.
Certain modules, and Webpack optimization tools require specific modes. But in this case I defaulted to development mode.
entry – Accepts a string or an array of string. A string in here represents a path to a JavaScript file that will act as an entry point.
The value on this configuration file is pointing to an index.js file that will be under a directory called src.
output – Tells Webpack how to output the bundle.
In the configuration above, I’m telling Webpack to output the bundle file under a the path static/js and name the file bundle.js.
You don’t need to create any directories, Webpack will do that for us.
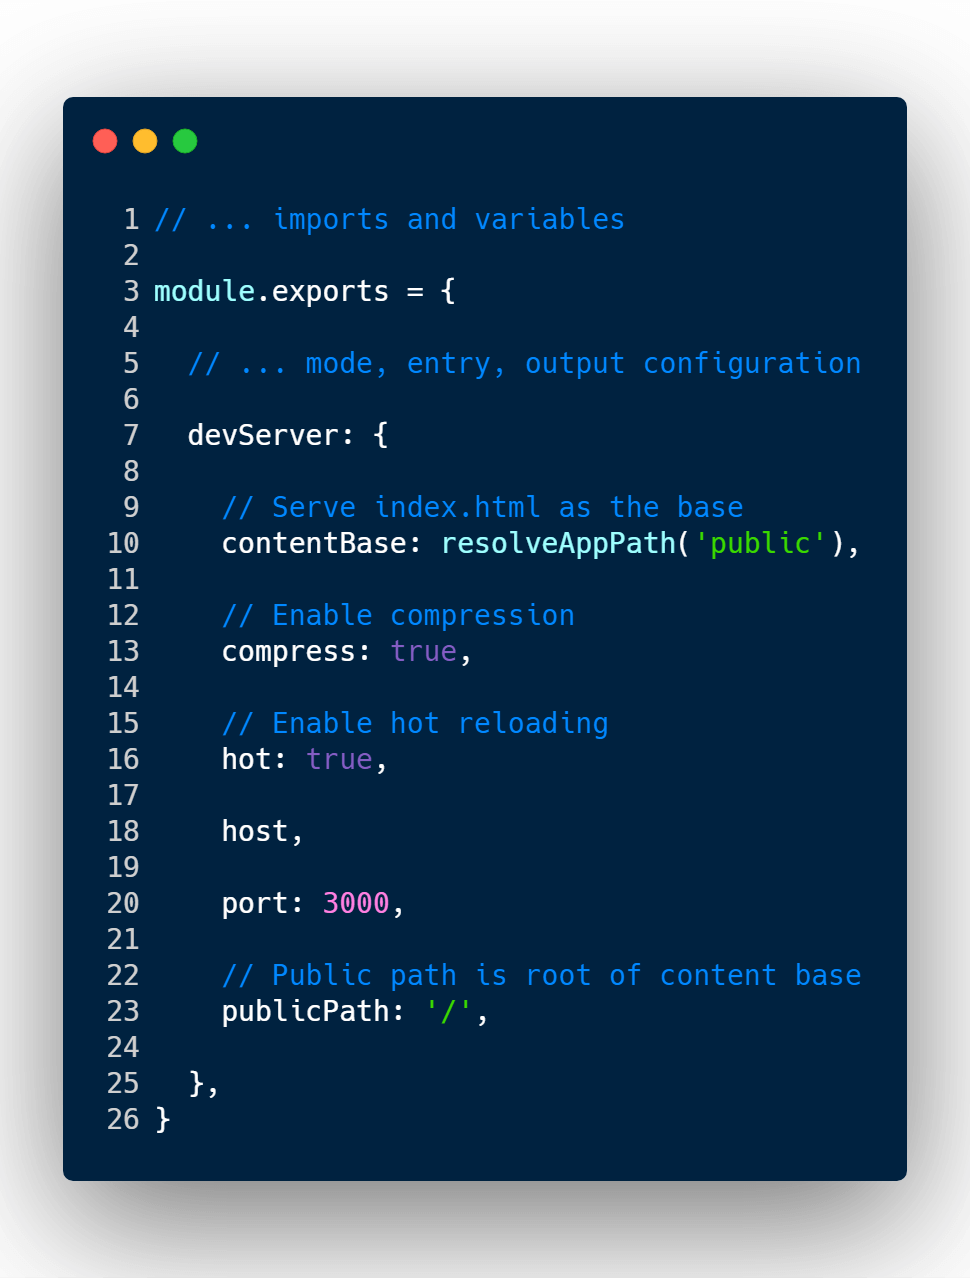
How to setup Webpack dev server configurations
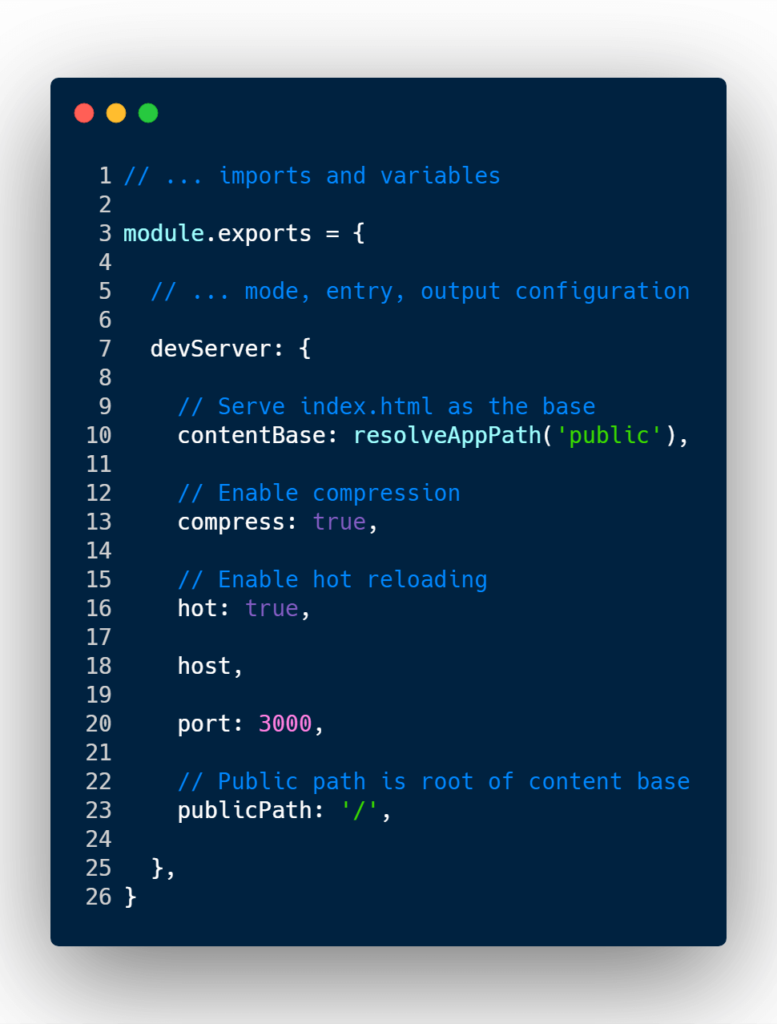
// ... imports and variables

module.exports = {
  // ... mode, entry, output configurations

  devServer: {

    // Serve index.html as the base
    contentBase: resolveAppPath('public'),

    // Enable compression
    compress: true,

    // Enable hot reloading
    hot: true,

    host,

    port: 3000,

    // Public path is root of content base
    publicPath: '/',

  },
}
These configurations are responsible to tell webpack-dev-server what host, port number, and what content base to use.
Let’s breakdown the configuration:
contentBase – This property tells Webpack what static file it should serve. In this case we want to serve our index.html file that was created in the public directory.
compress – This enables gzip compression for everything that is being served.
hot – This property enables hot reloading. Whenever you modify a file, the browser will automatically refresh with the new updates.
This property requires the HotModuleReplacementPlugin. I did not have to add it too the package.json file, because webpack-dev-server adds that for you.
host – By default it uses localhost as the host name but you’re more than welcome to use whatever you want.
port – Specifies what port number to listen too. For this tutorial it will be port 3000.
So the browser URL will be localhost:3000.
publicPath – Defines what the browser path will look like when serving public assets.
At this point you can run npm start, and it will serve the static HTML file.
But we’re trying to develop a React application with it, so let’s tell it to embed the main source file of our app.
P.S. I will be creating the main React app source as the final step.
How to use HTML webpack plugin for your JS app
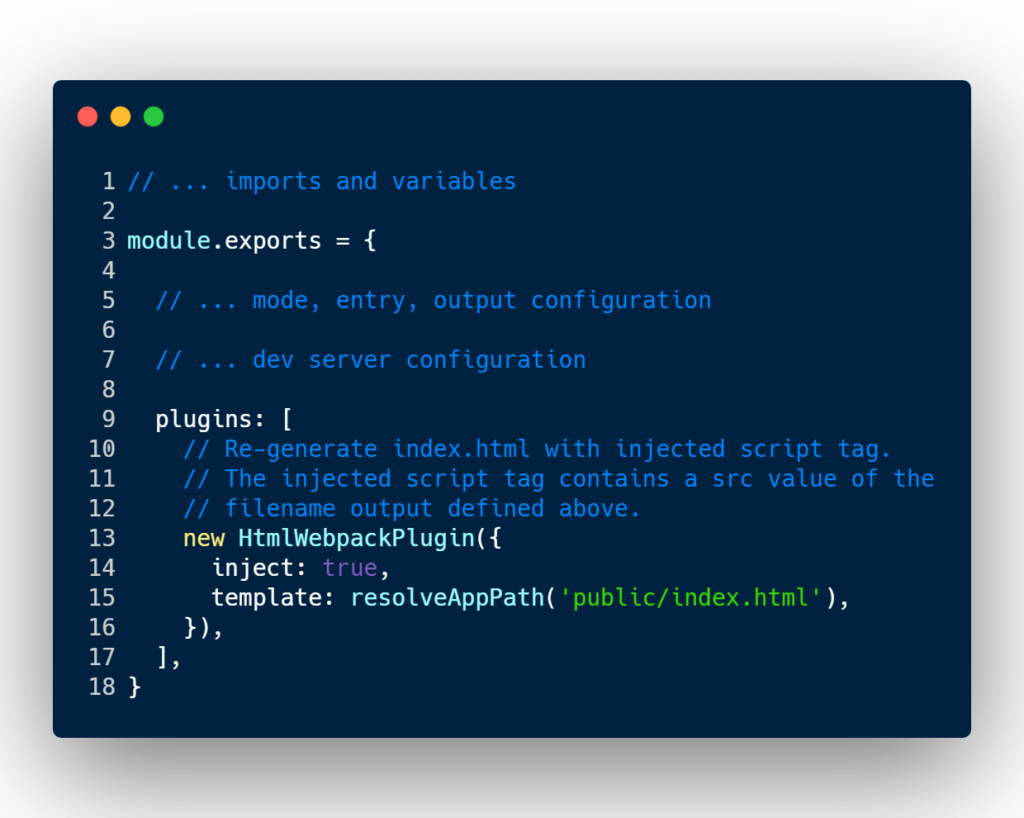
// ... imports and variables

module.exports = {
  // ... mode, entry, output configurations

  // ... dev server configurations

  plugins: [
    // Re-generate index.html with injected script tag.
    // The injected script tag contains a src value of the
    // filename output defined above.
    new HtmlWebpackPlugin({
      inject: true,
      template: resolveAppPath('public/index.html'),
    }),
  ],
}
In the first step of this guide, I imported a module called html-webpack-plugin.
That node module will help Webpack stitch the main React source file, and the index HTML file together.
In the example above I’m telling html-webpack-plugin what template to use, and passing the inject property as true.
And that’s it! Let’s create the React app now.
Creating a simple React hello world
The first step is to create a directory called src in the root of the project.
And inside the directory, src, create a file named index.js.

The code sample above is some basic React code that creates an H1 element that says “Hello World”.
And ReactDOM is attaching to the element with an ID of root.
But it’s 2020 and no one develops React with vanilla JavaScript. Let’s add JSX support to our Webpack build.
How to add JSX to React with Webpack
The first step we need to take is to install a few more dev dependencies. I’m going to run the following command.
npm i --save-dev babel-loader babel-preset-react-app @babel/core
Let’s do a quick break down of what I’ve just installed.
@babel/core – Is the engine that converts next generation JavaScript code into something that is cross compatible with browsers.
babel-loader – This module is the middleware that let’s us use babel core and Webpack together.
babel-preset-react-app – This module is a preset that we can attach to Webpack. It helps Babel transform JSX code into plain JavaScript code.
It’s built and maintained by the Create React App team.
Now we must add to the Webpack configuration.
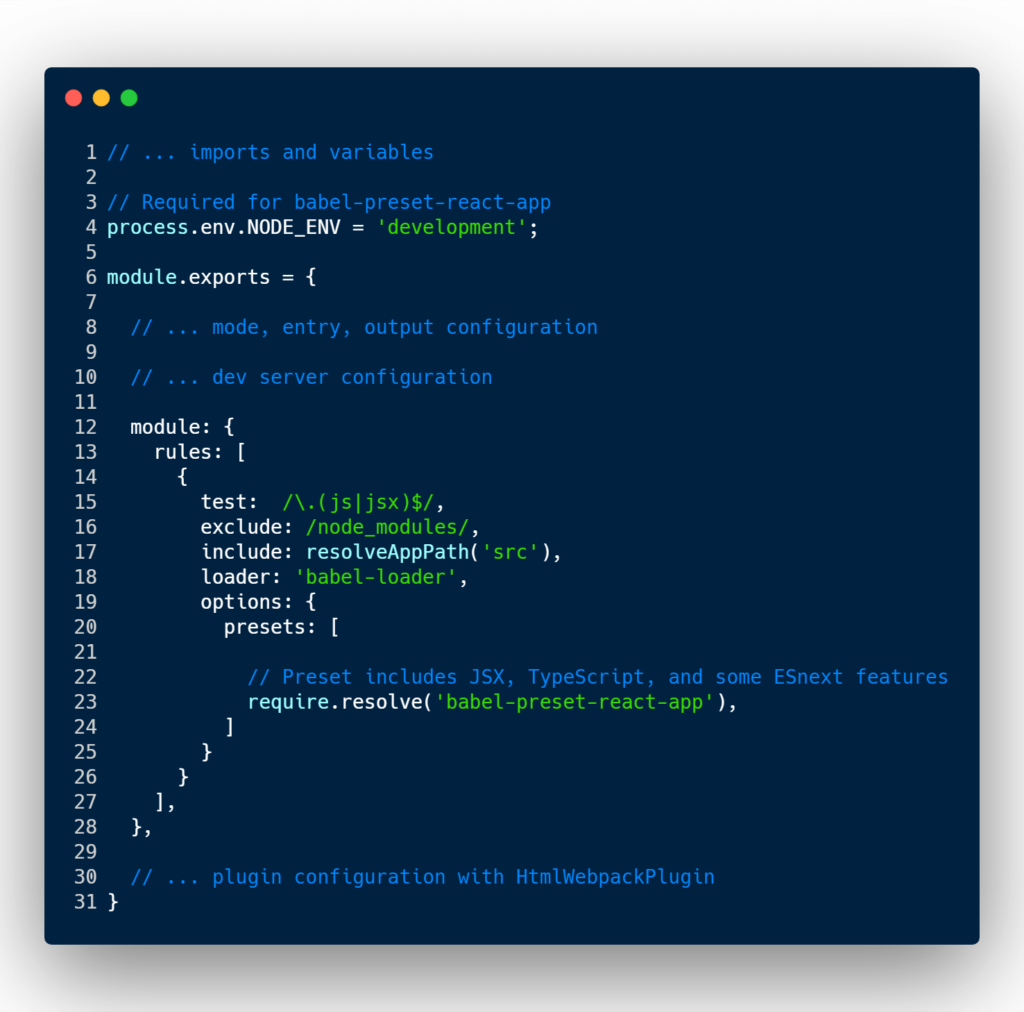
The first step I need to make is to create an environment variable called NODE_ENV.
This is required for the babel preset I’m about to use.
In this example, I’m assigning it the value of development on line 4.
This value may either be development or production.
The next step is to update the Webpack configuration object.
Right above the plugin property, I’ve added a property called module.
Module has another property called, rules. In there we can toss a rule to make Webpack use our babel modules to convert JSX code into plain JavaScript.
Why would we want to do this?
Because the browser doesn’t understand JSX syntax, it only understand JavaScript syntax.
The only thing we care about is writing JSX code during development, and making the output into vanilla JavaScript.
Let’s do one final breakdown for what’s going on in the rules object.
test – I’m telling Webpack to execute this rule only on files ending on .js or .jsx.
exclude – Don’t apply this rule to any files in node_modules.
include – Apply this rule to any JS or JSX files inside the directory, src.
loader – If the conditions above are met, use the babel-loader.
options.presets – Allow JSX syntax to be supported.
Conclusion
Now that all of the steps above have been completed you may run npm start to create your local dev environment, and begin developing your React application.
If you’d like to see what are some top Webpack plugins to optimize your React app, check out this article: Top Webpack plugins
Or if you’re interested on how to simulate REST API calls for your Webpack React project, check this article: How to simulate React REST API calls with Webpack dev server proxy
If you’d like to see the source code, click the link below.
Don’t forget to give it a star if your liked this Webpack tutorial.
I like to tweet about Webpack and post helpful code snippets. Follow me there if you would like some too!
